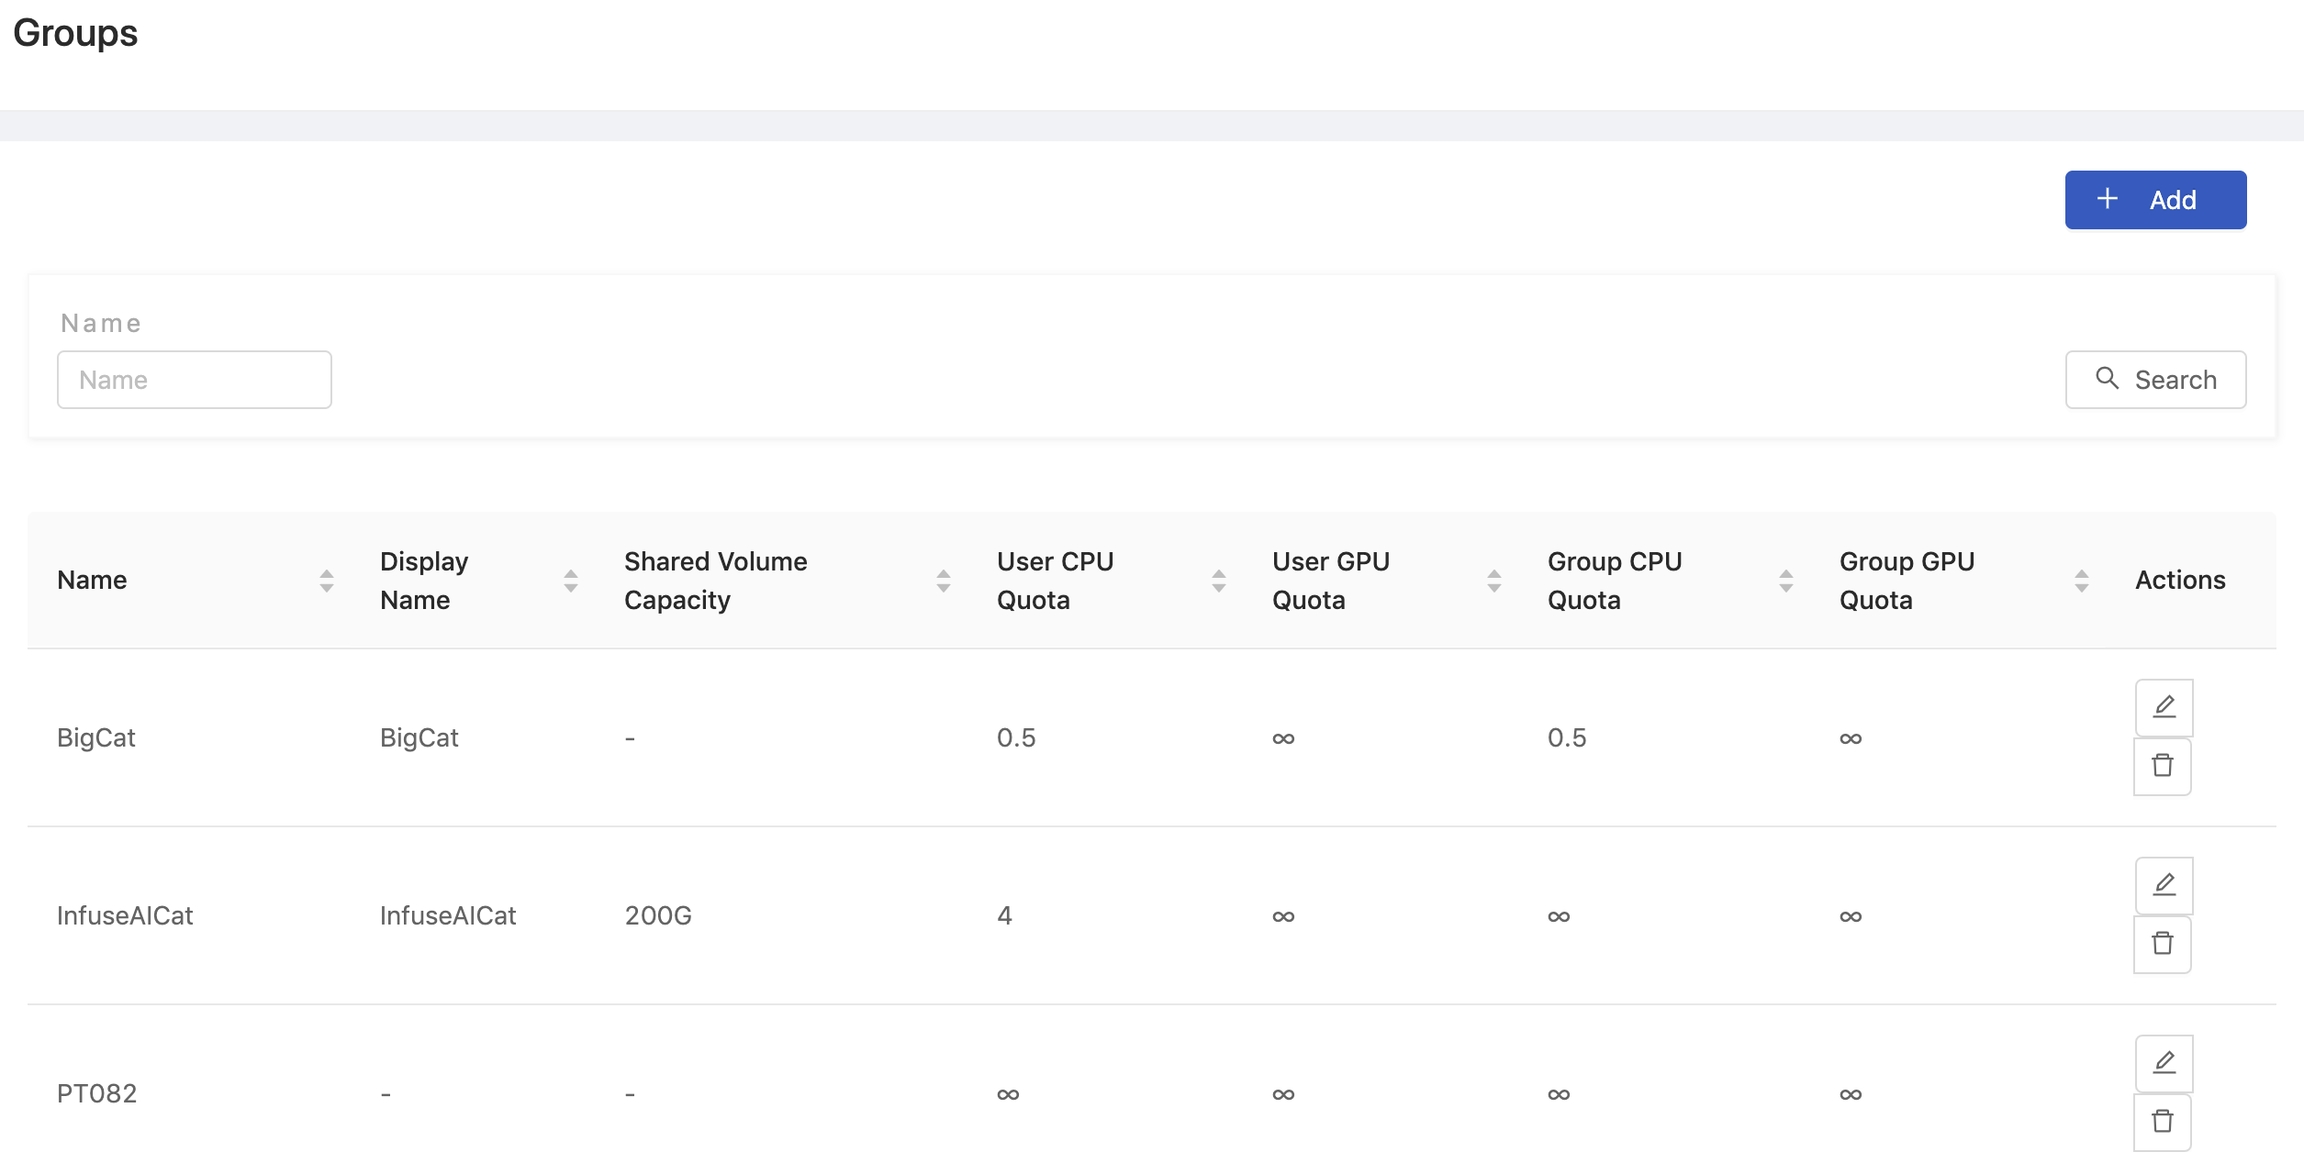
PrimeHub
  • Introduction
  • Installation
  • Tiers and Licenses
  • End-to-End Tutorial
    • 1 - MLOps Introduction and Scoping the Project
    • 2 - Train and Manage the Model
    • 3 - Compare, Register and Deploy the Model
    • 4 - Build the Web Application
    • 5 - Summary
  • User Guide
    • User Portal
    • Notebook
      • Notebook Tips
      • Advanced Settings
      • PrimeHub Notebook Extension
      • Submit Notebook as Job
    • Jobs
      • Job Artifacts
      • Tutorial
        • (Part1) MNIST classifier training
        • (Part2) MNIST classifier training
        • (Advanced) Use Job Submission to Tune Hyperparameters
        • (Advanced) Model Serving by Seldon
        • Job Artifacts Simple Usecase
    • Models
      • Manage and Deploy Model
      • Model Management Configuration
    • Deployments
      • Pre-packaged servers
        • TensorFlow server
        • PyTorch server
        • SKLearn server
        • Customize Pre-packaged Server
        • Run Pre-packaged Server Locally
      • Package from Language Wrapper
        • Model Image for Python
        • Model Image for R
        • Reusable Base Image
      • Prediction APIs
      • Model URI
      • Tutorial
        • Model by Pre-packaged Server
        • Model by Pre-packaged Server (PHFS)
        • Model by Image built from Language Wrapper
    • Shared Files
    • Datasets
    • Apps
      • Label Studio
      • MATLAB
      • MLflow
      • Streamlit
      • Tutorial
        • Create Your Own App
        • Create an MLflow server
        • Label Dataset by Label Studio
        • Code Server
    • Group Admin
      • Images
      • Settings
    • Generate an PrimeHub API Token
    • Python SDK
    • SSH Server Feature
      • VSCode SSH Notebook Remotely
      • Generate SSH Key Pair
      • Permission Denied
      • Connection Refused
    • Advanced Tutorial
      • Labeling the data
      • Notebook as a Job
      • Custom build the Seldon server
      • PrimeHub SDK/CLI Tools
  • Administrator Guide
    • Admin Portal
      • Create User
      • Create Group
      • Assign Group Admin
      • Create/Plan Instance Type
      • Add InfuseAI Image
      • Add Image
      • Build Image
      • Gitsync Secret for GitHub
      • Pull Secret for GitLab
    • System Settings
    • User Management
    • Group Management
    • Instance Type Management
      • NodeSelector
      • Toleration
    • Image Management
      • Custom Image Guideline
    • Volume Management
      • Upload Server
    • Secret Management
    • App Settings
    • Notebooks Admin
    • Usage Reports
  • Reference
    • Jupyter Images
      • repo2docker image
      • RStudio image
    • InfuseAI Images List
    • Roadmap
  • Developer Guide
    • GitHub
    • Design
      • PrimeHub File System (PHFS)
      • PrimeHub Store
      • Log Persistence
      • PrimeHub Apps
      • Admission
      • Notebook with kernel process
      • JupyterHub
      • Image Builder
      • Volume Upload
      • Job Scheduler
      • Job Submission
      • Job Monitoring
      • Install Helper
      • User Portal
      • Meta Chart
      • PrimeHub Usage
      • Job Artifact
      • PrimeHub Apps
    • Concept
      • Architecture
      • Data Model
      • CRDs
      • GraphQL
      • Persistence Storages
      • Persistence
      • Resources Quota
      • Privilege
    • Configuration
      • How to configure PrimeHub
      • Multiple Jupyter Notebook Kernels
      • Configure SSH Server
      • Configure Job Submission
      • Configure Custom Image Build
      • Configure Model Deployment
      • Setup Self-Signed Certificate for PrimeHub
      • Chart Configuration
      • Configure PrimeHub Store
    • Environment Variables
Powered by GitBook
On this page
  • Groups List
  • Creating New Group
  • Info
  • Instance Types
  • Images
  • Volumes
  • Deleting Group
  • Editing Group
  1. Administrator Guide

Group Management

PreviousUser ManagementNextInstance Type Management

Last updated 2 years ago

Groups List

It lists all of groups in pages, clicking a header of a column for ascending/descending sorting.

Creating New Group

Click Add to add a group, which will pop up the editing screen of Groups.

Info

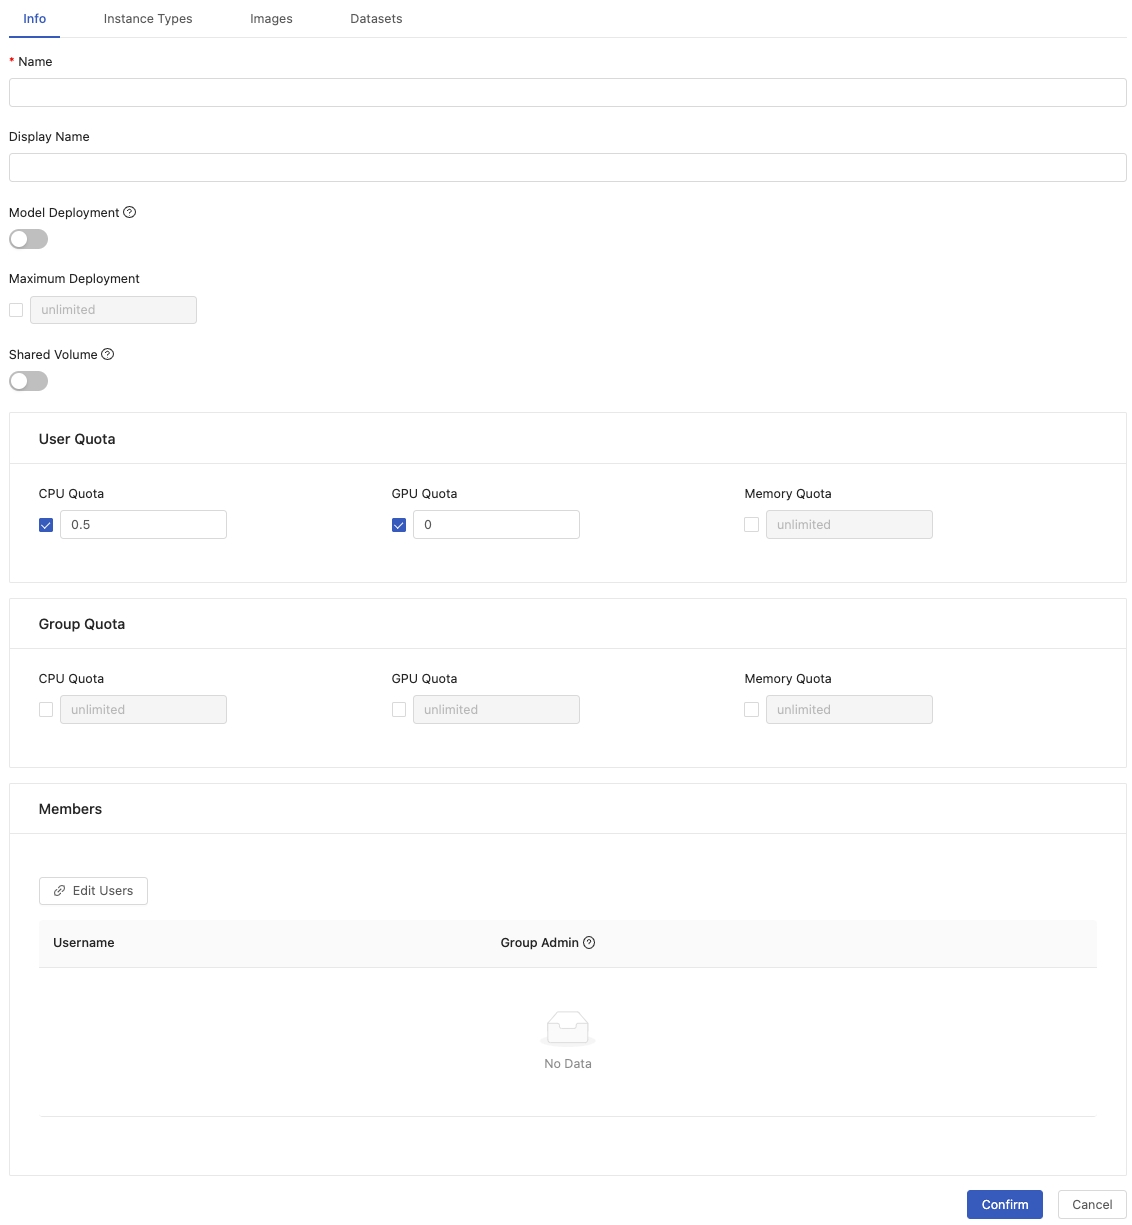
You need to fill in the fields in the above picture:

  • Name (required): Only lowercase letters, numbers, hyphen - and the underscore _ can be filled in.

  • Display name

Model Deployment

Groups with enabled model deployment are able to deploy/serve models via Model Deployment.

  • Maximum Deployment: set limit on the amount of deployments for this group; it takes running deployments into consideration only, i.e., stopped deployments are not counted.

Shared Volume

Create shared volume with specific capacity. The shared volume is shared among members in the group.

  • Shared Volume Capacity Set the capacity of the shared volume.

  • Launch Group Only Set if the shared volume is only mounted in the launch group. When a user open a notebook, by default, it will mount the shared volume of the current launch group. However, if the user is also the member of a group which configures shared volume Launch Group Only as false, this volume would be also mounted in this notebook. In this case, you can see current group shared volumes and some non-launch group shared volumes are all mounted in the /project/ folder.

User Quota

Set quotas for each user in this group.

  • CPU Quota How many CPU can be used by the user within this group. The default is 0.5.

  • GPU Quota How many GPU can be used by the user within this group. The default is 0. Default is 0 that means users can't use GPU.

  • Memory Quota How many Memory can be used by the user within this group. The default is unlimited.

Group Quota

Set quota for the whole group.

  • CPU Quota When the user chooses the group, how many CPU can be shared by all users in the group. The default is unlimited.

  • GPU Quota When the user chooses the group, how many GPU can be shared by all users in the the group. Default is unlimited.

  • Memory Quota When the user chooses the group, how many Memory can be shared by all users in the the group. Default is unlimited.

Click Confirm to complete the addition.

Members

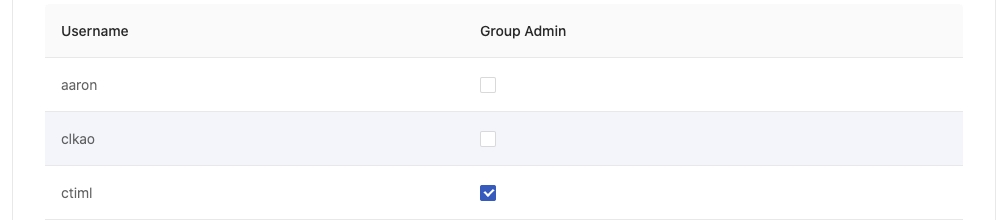
The list shows all of users of this group. Click edit users to add/remove users into/from groups.

Group Admin

Also, multiple members are able to be assigned Group Admin for a group.


Instance Types

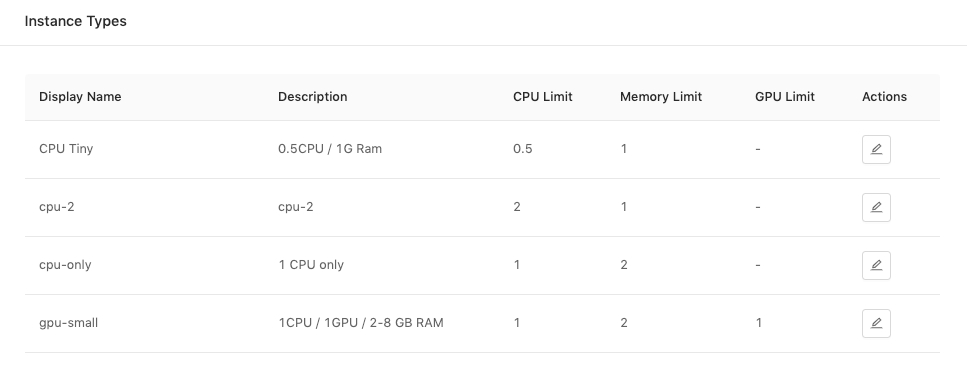
The list shows connecting instance types which are able to be used by this group.

Images

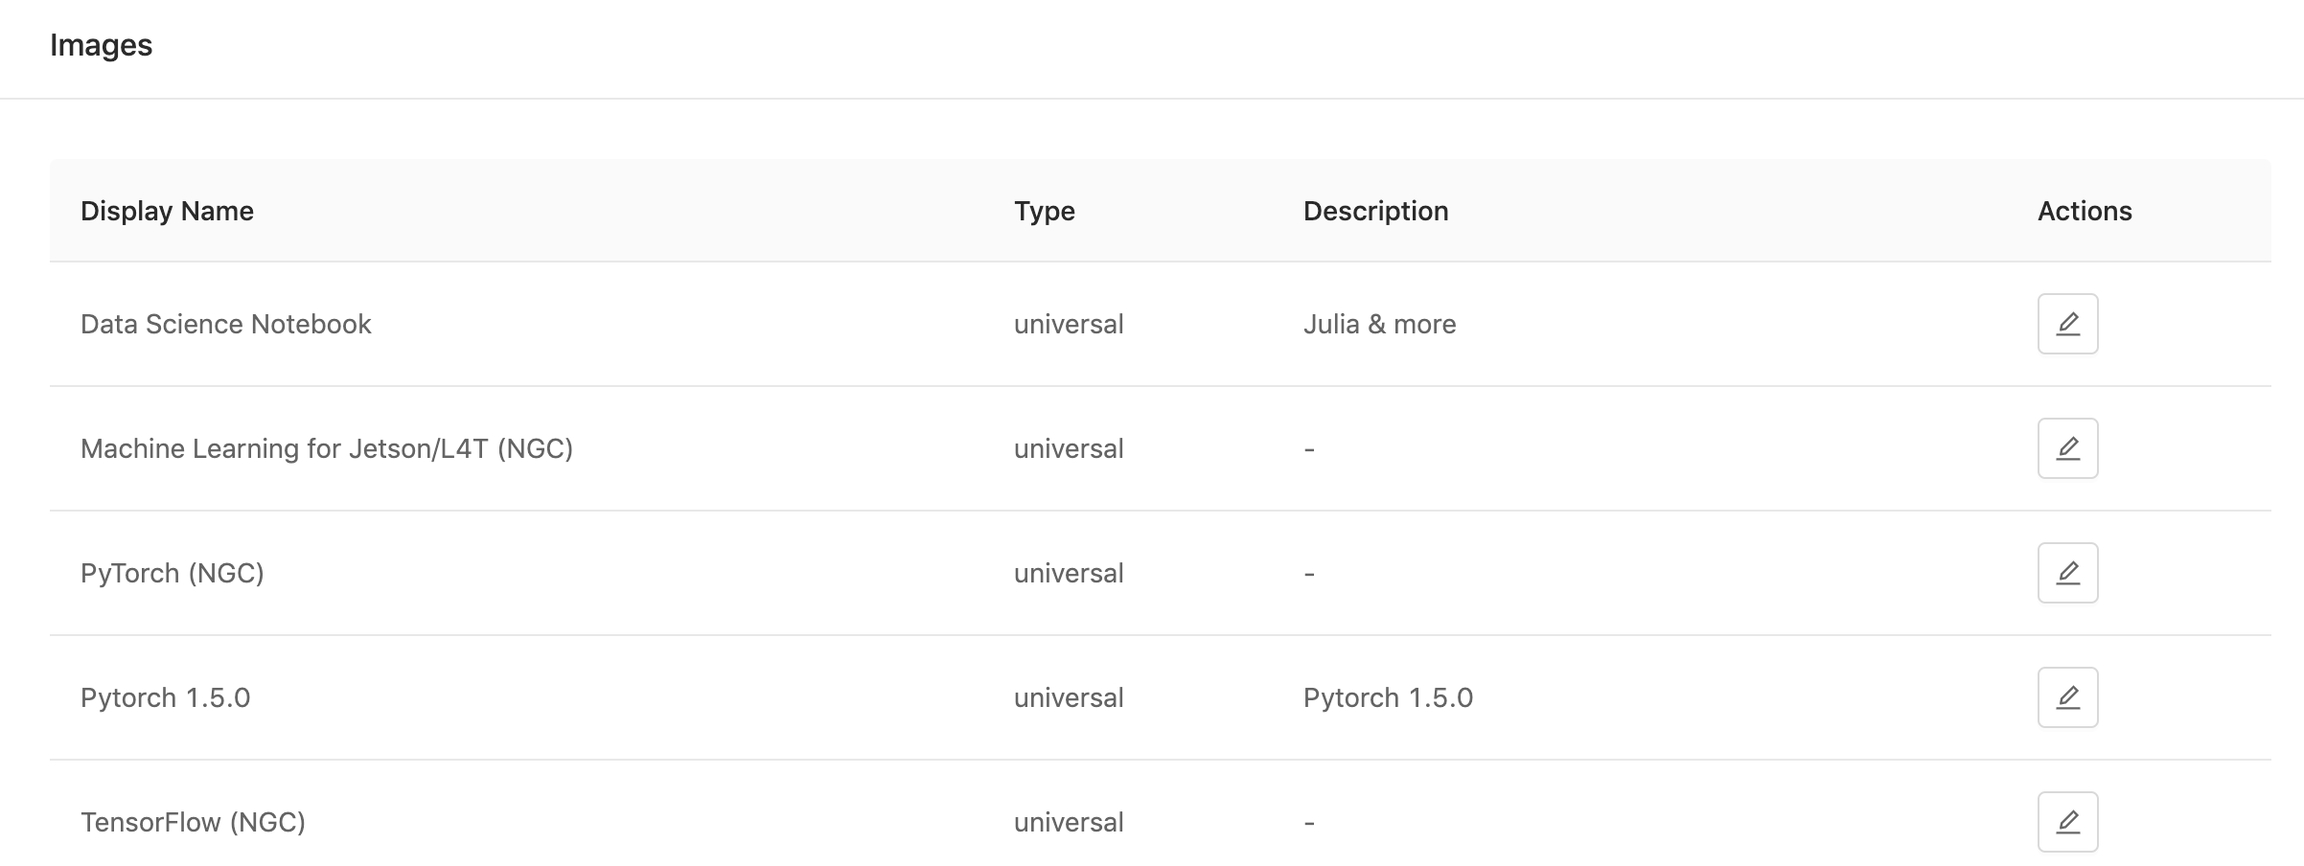
The list shows connecting images which are able to be used by this group.

Volumes

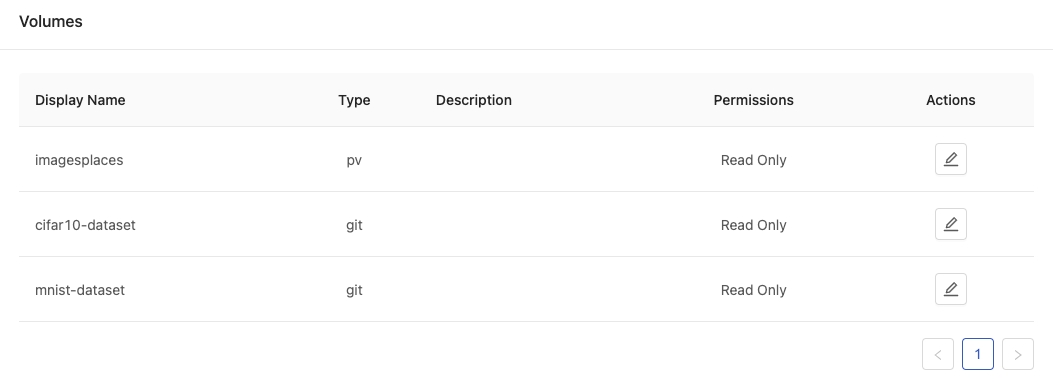
The list shows connecting volumes which can be read or written. We also can edit these volumes through here.

Deleting Group

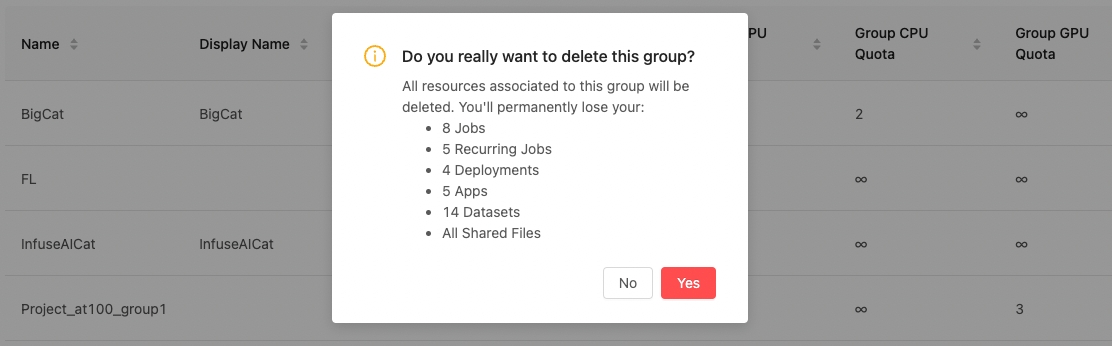
Click Delete button in the group list, the confirmation dialog will pop up.

The group and all associated resources such as Jobs, Recurring Jobs, Deployments, Apps, Datasets, and all the Shared Files will be deleted when you click Yes.

Editing Group

Click Edit button to enter the edit page of the Group.

Group Admin have the privilege to access features dedicated to them on User Portal, such as .

Image